In the swiftly evolving tech world, mastering the AWS Command Line Interface (AWS CLI) has become a non-negotiable skill for developers and IT professionals. AWS CLI stands as a bridge to managing Amazon Web Services’ resources, enabling direct command-line access across various operating systems. This comprehensive guide will escort you through the seamless setup of AWS CLI on Linux, macOS, and Windows, ensuring you’re equipped to harness the full potential of AWS services.
📌 Section 1: Setting Up AWS CLI
🖥️ Installing AWS CLI Across OS
- For Windows Users:
- Launch the terminal.
- Download and execute the AWS CLI MSI installer for Windows (64-bit) from here.
- Alternatively, employ the
msiexec.execommand for installation:msiexec.exe /i https://awscli.amazonaws.com/AWSCLIV2.msi
- Alternatively, employ the
- Confirm the installation with
aws --version. You should see the AWS CLI version displayed, confirming a successful setup.
- For Linux Users (x86_64/ARM):
- Open your terminal.
- Install AWS CLI using the following:
- x86_64:
curl "https://awscli.amazonaws.com/awscli-exe-linux-x86_64.zip" -o "awscliv2.zip"

unzip awscliv2.zip

sudo ./aws/install
- ARM:
curl "https://awscli.amazonaws.com/awscli-exe-linux-aarch64.zip" -o "awscliv2.zip"

unzip awscliv2.zip

sudo ./aws/install
- x86_64:
- For macOS Users:
- GUI installer:
- Download the macOS pkg file here.
- Execute the downloaded file and follow the prompts. Install AWS CLI globally or in a specified folder, with a symlink created at
/usr/local/bin/aws.
- Command line (for all users):
curl "https://awscli.amazonaws.com/AWSCLIV2.pkg" -o "AWSCLIV2.pkg"

sudo installer -pkg AWSCLIV2.pkg -target /
- Validate the installation with
$ which awsand$ aws --versionto ensure your system recognizes the AWS CLI.
- GUI installer:
📌 Section 2: Configuring AWS CLI
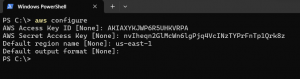
To begin interacting with your AWS account, configure AWS CLI by typing aws configure in your terminal. You’ll need to enter your AWS Access Key ID, Secret Access Key, preferred region, and output format.
Here is the step-by-step Screenshots:
Login to your AWS Console: Clicke here to login AWS Console
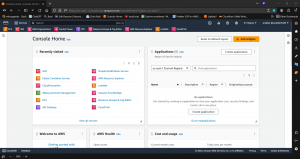
Go to Seachbar and Search for IAM :
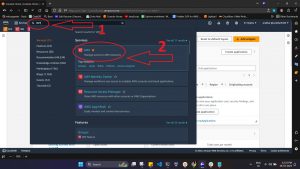
Now, In IAM follow the Screenshot:
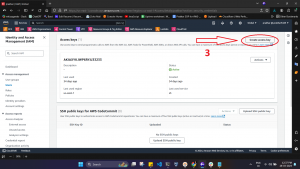
Screenshot:
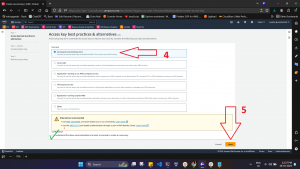
Screenshot:
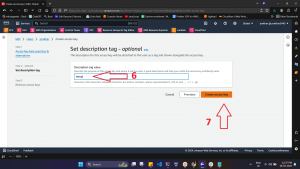
Screenshot:
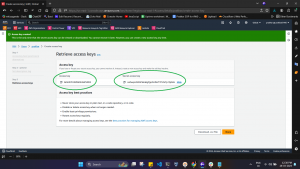
Now, Let’s configure the AWS CLI:
Screenshot:
📌 Section 3: Mastering Commands with AWS CLI
Dive into these basic commands to kickstart your AWS CLI journey:
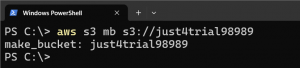
- Creating an S3 Bucket:
aws s3 mb s3://<bucket-name>
Screenshot:
- Listing S3 Buckets:
aws s3 ls
Screenshot: AWS console S3 bucket Screenshot:
- Launching an EC2 Instance:
aws ec2 run-instances --image-id <AMI-ID> --instance-type <instance-type> --key-name <key-name> --subnet-id <subnet-id>
Screenshot:

- Enumerating EC2 Instances:
aws ec2 describe-instances
Screenshot: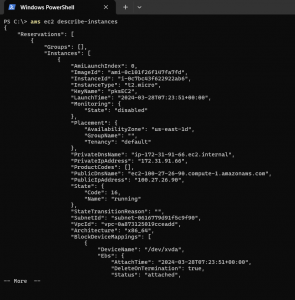 AWS console EC2 instance Screenshot:
🌟 Conclusion
Navigating through AWS CLI setup and command execution across Linux, macOS, and Windows has never been easier. By embracing the insights and steps outlined in this guide, you’re well on your way to optimizing your AWS management tasks. AWS CLI not only enhances your productivity but also empowers you to navigate the vast cloud computing landscape with agility and confidence. Here’s to mastering AWS CLI—your key to unlocking the full potential of cloud resources. Happy coding! 🚀✨

")
